WebSocket接続は Plugin_Remote が提供しています。利用時はこのプラグインが有効になっているか確かめてください。
WebSocket を用いた通信 #
WebSocket を使った 接続・制御に対応しています。MMDAgent-EX はクライアントとして .mdf で指定されたWebSocketサーバへ接続します。接続が確立したら、以降、MMDAgent-EX のすべてのメッセージがサーバへ送られます。また、サーバからソケットへ送られたテキストは MMDAgent-EX 内部へメッセージとして発行されます。
MMDAgent-EX の接続先を設定する #
接続先の WebSocket サーバのホスト名、ポート番号、パスを .mdf で指定します。これらの指定を行うことでこの機能がONになります。
Plugin_Remote_Websocket_Host=localhost
Plugin_Remote_Websocket_Port=9001
Plugin_Remote_Websocket_Directory=/chat
WebSocket Secure (WSS) サーバ(wss://foo.bar.com/channel のようにスキームが wss のサーバ)へ接続する場合はポート番号に 443 を指定してください。ws:// スキームは 80 です。
Plugin_Remote_Websocket_Host=foo.bar.com
Plugin_Remote_Websocket_Port=443
Plugin_Remote_Websocket_Directory=/channel
WebSocket と TCP/IP は同時に設定できません。WebSocket を利用する際は TCP/IP サーバ・クライアントの設定を .mdf から省いてください。
例1:MMDAgent-EX からメッセージを受信する #
以下は サーバ 側のサンプルです。このプログラムは、WebSocket サーバとして 9001 番ポートで起動したあと、ローカルから接続してきた MMDAgent-EX から受信したメッセージを print します。事前に asyncio と websockets を pip install して下さい。
import asyncio
import websockets

# handler for each connection
async def handle_client(websocket, path):
    print("connected")
    async for message in websocket:
        print(f"Received message: {message}")

# main
async def main():
    async with websockets.serve(handle_client, "localhost", 9001):
        await asyncio.Future()  # run forever

if __name__ == '__main__':
    asyncio.run(main())
上記を起動後、以下の設定を施した .mdf を指定して MMDAgent-EX を起動してください。
Plugin_Remote_Websocket_Host=localhost
Plugin_Remote_Websocket_Port=9001
Plugin_Remote_Websocket_Directory=/chat
起動後、通信が確立してから、プログラム側に MMDAgent-EX から受信したメッセージが逐次表示されます。
例2:メッセージの送受信を同時に行う #
上記のプログラムを拡張して送信も並列して行えるようにしてみましょう。以下のプログラムは、
- MMDAgent-EX から受け取ったメッセージを print する
- 2秒に1回
TEST_MESSAGEというメッセージを MMDAgent-EX へ送る
という2つの動作の両方を行う例です。非同期I/Oを使い、asyncio.create_task() で受信と送信の非同期タスクをそれぞれ生成しています。
注意:送信メッセージの末尾に必ず改行("\n")を付ける必要があることに注意してください。MMDAgent-EX は改行をデリミタとしてメッセージを処理しています。
import asyncio
import websockets
import time

##################################################
# handler for received messages
async def consumer_handler(websocket):
    async for message in websocket:
        print(f"Received message: {message}")

##################################################
# handler to send message: you must append "\n" for each message!
async def producer_handler(websocket):
    while True:
        await asyncio.sleep(2)
        message = "TEST_MESSAGE\n"
        await websocket.send(message)

##################################################
# handler for each connection
async def handle_client(websocket, path):
    # create task to read from the socket
    consumer_task = asyncio.create_task(consumer_handler(websocket))
    # create task to write to the socket
    producer_task = asyncio.create_task(producer_handler(websocket))
    # wait at least one task has been terminated
    done, pending = await asyncio.wait(
        [consumer_task, producer_task],
        return_when=asyncio.FIRST_COMPLETED,
    )
    # cancel other task and close connection
    for task in pending:
        task.cancel()

# main
async def main():
    async with websockets.serve(handle_client, "localhost", 9001):
        await asyncio.Future()  # run forever

if __name__ == '__main__':
    asyncio.run(main())
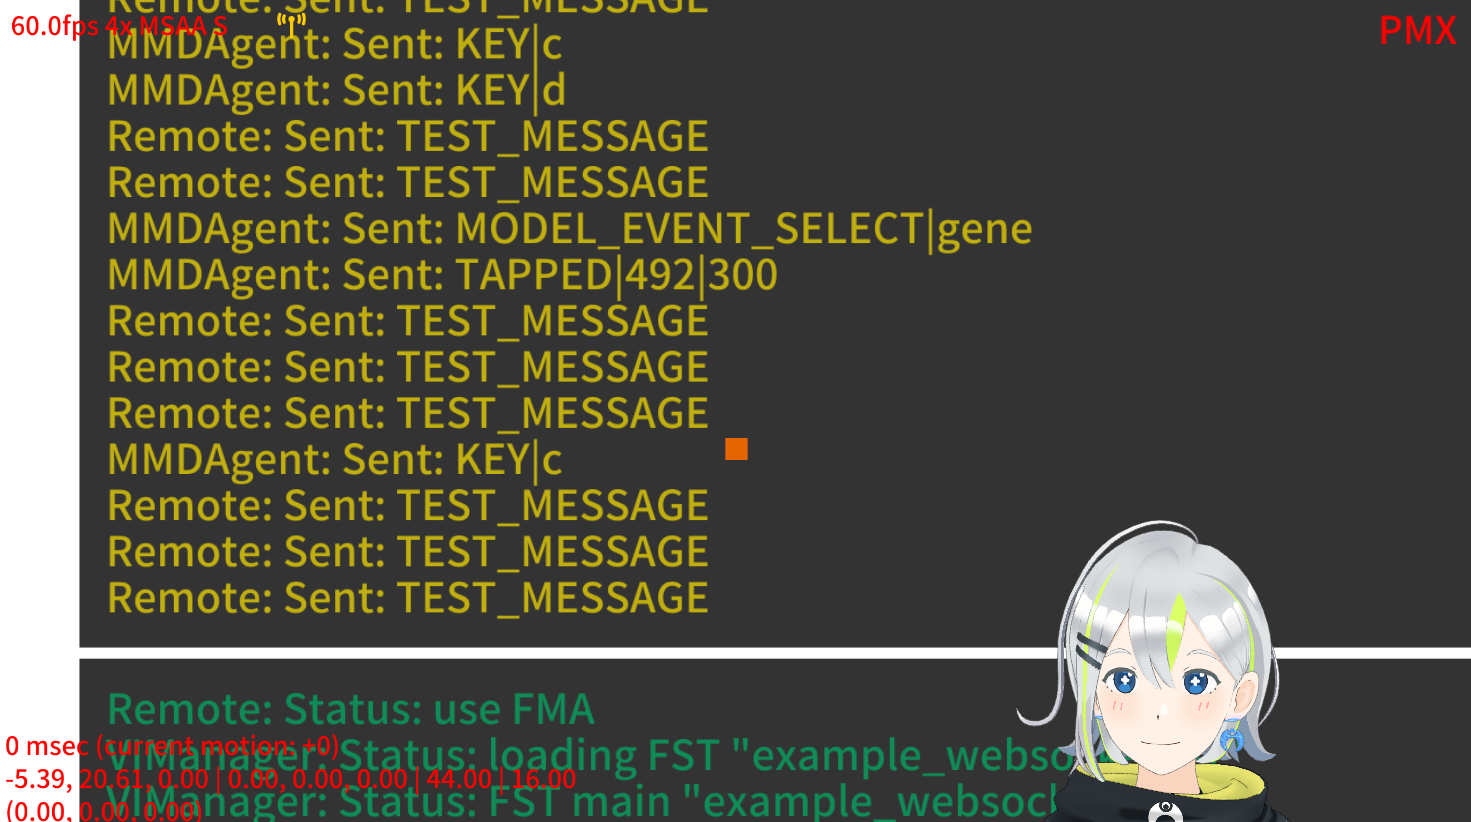
このサーバを起動後、MMDAgent-EX を起動したら d キーを押して、以下のようにサーバからのテストメッセージ(TEST_MESSAGE)が2秒おきに届くことを確かめましょう。
ここで説明した設定やプログラムと同じものが Example の example_websocket フォルダ以下にも収められており、試すことができます。